Authenticate Users in your App using OpenID Connect with PKCE
Client applications with human users must complete an authentication and authorization flow to obtain authorization to use Apiture Digital Banking APIs.
To learn more about the basics of authentication and authorization, see Authorization and Authentication.
Which Method of Authentication do I Need?
This tutorial will guide you through setting up OpenID Connect authentication, which is meant for client applications that have users, such as web and mobile applications. This method of authentication uses an Authorization code flow with Proof Key for Code Exchange (PKCE), and is the method this article discusses.
For machine-to-machine applications or headless interactions, such as for scripts and other backend applications that can securely store credentials, Apiture recommends using the Client Credential flow. Read the tutorial here for additional details.
For a conceptual explanation of the authentication and authorization, please see Authorization and Authentication.
Developer Portal Configuration
Before you start, you may need to do some initial setup in the Apiture Developer Portal.
For API-based Apiture products, use the Developer Portal to register your application before it can successfully authenticate. The authentication type must be set to Authorization Code if users are logging in using the application. The API credentials (or other authorization parameters) are provided in the Developer Portal.
For more information on creating an application in the Developer portal, read this article Creating Applications. You may also explore more of the Developer Portal section for additional information.
Where to Authenticate
To initiate authentication, the client must know where to authenticate the user and where to obtain the API authorization access token.
OpenID Connect provides a discovery mechanism to allow a client application to get API access authorization. The client begins by fetching the OpenID Connect configuration JSON data from the target environment.
For production (live) financial institution API environment, the root OIDC authority URL is https://auth.apiture.com/oidc/ and the OIDC discovery URL is https://auth.apiture.com/oidc/.well-known/openid-configuration .
If connecting to the Customer Acceptance Test (CAT) environment, The root OIDC authority URL is https://cat-oidc.apiture-comm-preprod.com/oidc/ and the OIDC discovery URL is https://cat-oidc.apiture-comm-preprod.com/oidc/.well-known/openid-configuration .
If connecting to the second Customer Acceptance Test (CAT2) environment, The root OIDC authority URL is https://cat2-oidc.apiture-comm-preprod.com/oidc/ and the OIDC discovery URL is https://cat2-oidc.apiture-comm-preprod.com/oidc/.well-known/openid-configuration .
Use an HTTP GET on the correct OIDC discovery URL to fetch the OpenID configuration data, and save the authorization_endpoint, token_endpoint, userinfo_endpoint and other connection parameters that are used to complete the authorization flows.
OpenID Connect Authorization Code Flow
OpenID Connect uses a series of checks and redirects, sending the user to a log in form and eventually granting a token for secure access. For the secure user login, the application redirects to the Apiture authorization server. The user logs into this authorization server.
After logging in successfully, the user is redirected back to the requesting application using the callback URI associated with the client application. This URI is set up in your Developer Portal account.
The application’s Authentication type must be set to Authorization Code in the Dev Portal. The Developer Portal does not provide a client secret to web or mobile applications that cannot safely store client secrets. Only a client ID is provided.
Listing Application Scopes
Every application in the Developer Portal has selected scopes that grants permission for the application to read or write specific information. This scope must be passed when requesting an access token for banking customer API access.
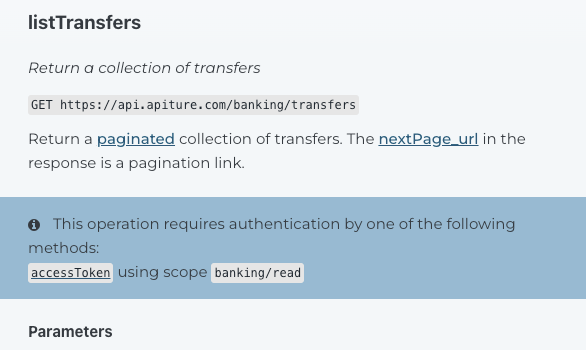
The scopes needed for functions are listed in the API Documentation. Under each functions description is a blue callout that lists the scopes required, such as:
When starting the Authorization Code Flow, the client passes a list of all the scopes it requires in the scope query parameter. This is a space-delimited list of the scope names. For example, if the client application will invoke API operations that require the banking/read and banking/write scopes, the request should pass the scope query parameter as
...&scope=openid%20offline_access%20banking/read%20banking/writeNote: The list of scopes must be URL encoded, so the space delimiters are encoded as %20 .
Note: The list must include the openid scope. The list should include offline_access scope if you wish to extend the user’s authentication session by using refresh tokens (see below).
Open ID Authentication Flow
To programmatically create an authentication flow:
- Generate a code verifier. A code verifier is a string made of random URL-safe characters. If desired, the code verifier can be generated by any third-party library that is used for PKCE authentication. The code verifier is used both to generate a code challenge, and confirm the challenge is correct in the request to the
token_endpoint. -
Generate a code challenge. A code challenge is a Base64-encoded SHA256 hash of the code verifier. If desired, the code challenge can be created by any third-party library that is used for PKCE authentication. The code challenge will be sent along to the
token_endpoint. - The client makes an authorization request by sending a
GETrequest to theauthorization_endpointfrom the OpenID Connect configuration data, passing several query parameters in the URI:
state={state}where{state}is a client generated random string.scope={url-encoded-list-of-scopes}(explained above)response_type=codeclient_id={clientId}where{clientId}is the registered client ID for that environment.-
code_challengegenerated using the code verifier (discussed in the steps above). This is used instead of a client secret for web or native applications to ensure security. -
code_challenge_methodmust be set toS256. This indicates the method of encryption. redirect_uri={url-encoded-redirect-uri}where{url-encoded-redirect-uri}is the callback URI associated with the client application. This must match the URI entered in the configuration in your Dev Portal account.
2. The authorization_endpoint validates the query parameters.
- If the parameters are valid, the user will be directed to a form to enter their login credentials. The user may also be prompted to give consent to specific application access.
Note: The client application does not need to pass the user’s credentials to authenticate. - If the parameters are invalid, the request will fail with a 4XX error.
3. If the client request and user authentication credentials are valid, the authorization request returns a 302 response. The response contains:
-
A Location header that contains the client redirect URI that is set up in your Developer Portal account.
-
A
codewhich will be used to generate an access token later. -
The client
statevalue that was passed in the original request.
If the user cannot be authenticated, they will be notified of a potential error. Client-side code does not need to handle this validation.
4. The client redirects to the redirect URI where the client will process the response. That client should ensure the state matches the one passed in the original request and should stop the flow if they do not match.
5. If the state matches, the client must exchange the code for an access token to complete authorization. This step should be done securely in your server-side code connected to the redirect URI. This is done by a POST request to the token_endpoint URI passing the parameters as form data using Content-Type: application/x-www-form-urlencoded. The form data consists of these values:
-
grant_type:
This must be set to authorization_code during initial authentication.grant_typeis required.-
client_id:
The client ID provided by Apiture within the Developer Portal. code:
This must be set to the authorization code returned via a callback redirect after performing the authorize request. This is required ifgrant_typeisauthorization_code.-
code_verifier:
The code verifier that was used to create thecode_challenge. redirect_uri:
The URI-encoded callback URI for user redirection after a successful authentication request. This value must match the value used during the client application registration process and the value passed to authorize. Required if using theauthorization_codeflow.
6. The response is a JSON body with four properties:
| Name (Type) | Description |
access_token (string) |
An opaque string which should be passed along with the token_type to subsequent API calls which require authentication. |
token_type (string) |
The form of token returned. This is typically the string Bearer: and the key which subsequent calls should use in the Authorization header when making authenticated API requests. |
expires_in (integer) |
The number of seconds until the access_token expires. Before it expires, use the refresh_token grant type to request a new access token. |
refresh_token (string) |
A token to use when the access_token expires. The client should retain this securely so it can obtain a new access_token before the current access token expires. |
The client combines token_type and access_token to form the Authorization header for API requests that require secure authorization, using this request header:
Authorization: token_type access_token
For example, if the token_type is Bearer and the acquired access_token is C1AC67D1EB404070B61DB7ECD5C635A7, the request should use
Authorization: Bearer C1AC67D1EB404070B61DB7ECD5C635A7
Refreshing Tokens
Tokens will expire when the expires_in countdown reaches zero. The token should be refreshed before then to keep the user logged in.
To refresh a token, send a POST request to the token_endpoint URI passing the parameters as form data using Content-Type: application/x-www-form-urlencoded. The form data consists of the following values:
-
grant_type:
This must be set torefresh_tokenwhen renewing an expired or expiring access token. grant_type is required.-
client_id: The client ID provided by Apiture within the Developer Portal. refresh_token={refresh_token}:{refresh_token}must be replaced with the refresh token saved from the initial authentication