Apiture Developers Apiture Developers

Menu

  • Explore API Banking
    • API Digital Banking
    • Embedded Banking
    • Contact Us
  • Developers
    • Quick Start Guide
    • Embedded Banking
    • Events Reference
    • Authenticated Portal
  • API Documentation
    • Reference
Log In / Register
Apiture Developers Apiture Developers
Log In / Register
Apiture Developers

Menu

  • Explore API Banking
    • API Digital Banking
    • Embedded Banking
    • Contact Us
  • Developers
    • Quick Start Guide
    • Embedded Banking
    • Events Reference
    • Authenticated Portal
  • API Documentation
    • Reference

Authenticated Portal

  • folder icon closed folder iconGetting Started
    • Registration
    • Profile
  • folder icon closed folder iconConcepts
    • Environments
    • Products
  • folder icon closed folder iconManaging your Applications
    • Creating Applications
    • Creating Data Direct: Real-Time Webhooks
    • Editing Applications
    • Application Owners
    • Getting Application Keys and IDs
    • Continue your Project
  • folder icon closed folder iconRelease Notes
    • Developer Portal 1.0
    • Developer Portal 1.1

Editing Applications

  • folder icon closed folder iconAPI Documentation
    • Getting Started
    • Concepts
      • API Keys
      • Authorization and Authentication
      • Access Tokens
      • Resources and URI Structure
      • Resource Collections
      • Resource Sets
      • Scopes & Entitlements
      • Error Responses
      • Error Types
      • Dry Runs
      • Markdown
      • Idempotent Operations
      • Collection Pagination
      • Collection Filtering
      • Transfers
      • Business Transfers
      • Cutoff Times
      • Identity Challenges
    • Guides
      • Authenticate Users in your App using OpenID Connect with PKCE
      • Authenticate using OAuth 2.0 Client Credentials Flow
      • Getting a List of Accounts
      • Listing the Balances for Accounts
      • Using Pagination
      • Creating a One-Time Transfer
      • Listing Transfers
      • Retrieving Business Transfer Information
      • Completing an Identity Challenge
    • API Reference
    • Release Notes
  • folder icon closed folder iconAuthenticated Portal
    • Getting Started
      • Registration
      • Profile
    • Concepts
      • Environments
      • Products
    • Managing your Applications
      • Creating Applications
      • Creating Data Direct: Real-Time Webhooks
      • Editing Applications
      • Application Owners
      • Getting Application Keys and IDs
      • Continue your Project
    • Release Notes
      • Developer Portal 1.0
      • Developer Portal 1.1
  • folder icon closed folder iconEmbedded Banking
    • Getting Started
    • Concepts
      • Overview
      • Managing User Credentials
      • Components
      • Registering your Application
      • Terminology
      • Encryption and Authentication
    • Guides
      • Component Customization
      • Customization Examples
      • Initializing Components
      • Event Handling and Data Processing
    • Release Notes
      • EB v1.0 Release Notes
      • EB v1.2.2 Release Notes
      • EB v1.3 Release Notes
      • Developer Portal 1.0 Update
  • folder icon closed folder iconEvents
    • Introduction
    • Guides
      • General Structure
      • Field Annotations
      • Customer Onboarding Data Direct: Real-Time
    • Data Delivery
      • Flat File Delivery
      • Snowflake Delivery
      • Event History API
      • Real-time / Webhooks

Editing Applications

Existing applications can be edited, deactivated and reactivated or deleted. Each application can also have many users invited to edit it as owners.

Viewing Applications and Environments

A list of current applications is viewable on the Applications screen, if any are available. Viewing an application also reveals the client ID and other application specific information that may be needed to connection to APIs or otherwise identify your application.

Filtering Applications

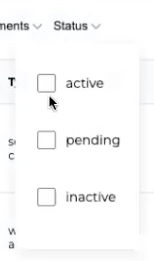
The applications can be filtered by several categories. Filters can be combined to find specific applications. In the screen shot below, only the inactive status filter is used. There is no limit to the number of filters that can be used.

Filters in top navigation

Products filters by the applications by products that your company is using. The products available and used will be different for every company.

Environments filters the applications by the environment assigned to it. For more information on Environments, see the environments article.

Status filters the applications by the status of the application. An application status can be active, pending, or inactive.

Active, pending and inactive filters

You may also filter for applications where you are the owner by clicking the checkbox to the right of the filters section.

Editing Applications

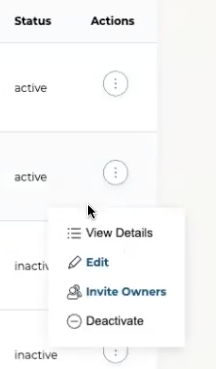
Most application information can be edited. From the Applications screen, click the Actions icon and select Edit.

Details context menu

Once you are on the Edit Application screen, the options available closely match the process for creating an application. See the Creating an Application section for more details. 

Some fields, such as Application Type and Authentication, cannot be edited once an application has been created. If the application needs an un-editable field changed, make a new application, and consider if the current application needs to be deactivated or deleted.

Deactivating, Reactivating, and Deleting

All applications can be in an active or inactive status. Inactive applications keep their application data in the developer portal but the keys the application uses to authenticate are deactivated. Any code using those keys will be unable to access the APIs or data.

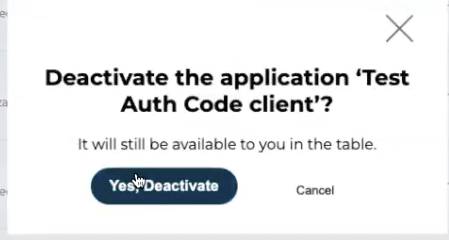
If an application is not being used, it should be deactivated for security purposes, which sets the status to inactive.

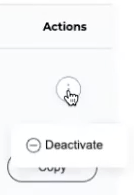
From the applications page, click the Actions icon and select Deactivate. A pop up appears asking for your confirmation.

Deactivate Icon

If the application should be permanently deleted and erased from the Developer Portal, ensure the application has been deactivated first. Click the Action icon on the Application page and select Delete. A pop up appears asking for your confirmation. This action cannot be undone.

Deactivation Confirmation Screen

To reactivate your application, click the Actions icon and select Reactivate. A pop up appears asking for your confirmation.

How can we help?

Get support for your issues.

Explore API Banking

  • API Digital Banking
  • Embedded Banking
  • Contact Us

Developers

  • Get Started Guide
  • API Reference
  • Embedded Banking

More

  • Apiture.com

Privacy Policy

© 2023 Apiture Inc.   |   All Rights Reserved